If your ISP provides a basic modem, you need a wireless router to share the Internet among multiple devices.
Belkin is one of the leading wireless router manufacturers which produces different types of wireless routers.
In this tutorial, you will learn how to configure Belkin Wireless Routers by accessing the web-based setup page without using the setup disc.
Though Easy Setup reduces our time to configure a device, manual configuration helps to make custom changes in the default settings.
Let us check how to manually configure various Belkin Router models like N150, N300, N600DB, N750DB, etc.
Setup Wireless Feature On Belkin Router
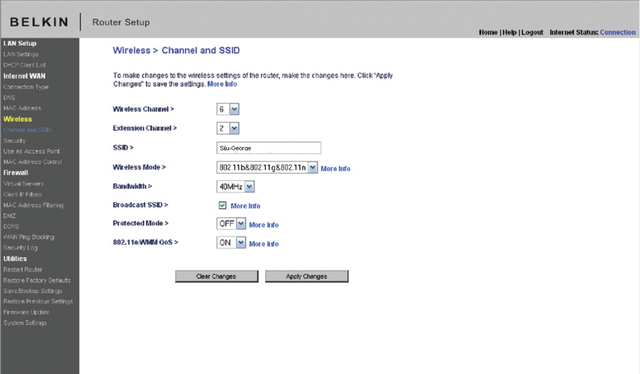
To edit the wireless settings, click on the Wireless tab on the setup page. You can edit the Wireless network name and wireless channel here.
Here I have customized certain WiFi settings with personalized information.

Wireless name (SSID) is the name of your wireless network. The most recommended wireless channel is 6. You can use channels 1 and 11 too.
You can use a new name for your WiFi network at the wireless name (SSID) field.
The most recommended wireless channel is 6. Other recommended wireless channels for Belkin WiFi router are 1 and 11.
It is good to change the default SSID with something another.
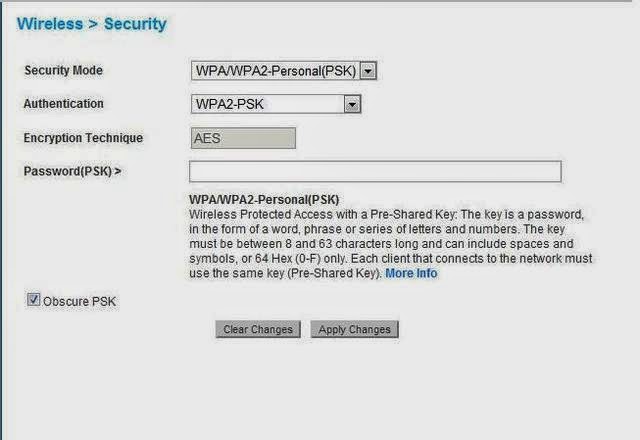
6. Enable Wireless Security
To enable WiFi security, click on security under the wireless tab, and follow the instructions in the link below.
How to Enable wireless security To Prevent Unauthorized Entry

Do not forget to Update the Firmware
How to Update the Firmware
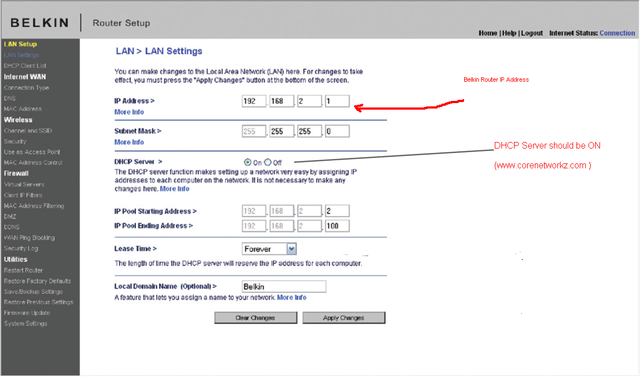
Change the LAN settings on the Belkin Router
You can change the router IP address from this window. By default, Belkin router IP address is 192.168.2.1, but you can change it to any other valid IP address.

There are some other points you must care about configuring the device. One of them is to ensure the safety of the wireless network.
It is a nice practice to enable MAC address filtering to avoid any unauthorized access to your WiFi network. To learn how to enable the MAC address filter, follow the link below.
How to enable MAC Address Filter
Can not Go Online After Installing Belkin Router
Some users say they were able to access the Internet before adding a Belkin router in their network.
After installing the router, they are not able to go online. There are so many reasons for this issue, and we have an article about how to deal with such a situation.
If you face such an issue on your network, follow the link below to fix it.
I cannot go online after installing the router
Belkin is one of the leading wireless router manufacturers which produces different types of wireless routers.
In this tutorial, you will learn how to configure Belkin Wireless Routers by accessing the web-based setup page without using the setup disc.
Though Easy Setup reduces our time to configure a device, manual configuration helps to make custom changes in the default settings.
Let us check how to manually configure various Belkin Router models like N150, N300, N600DB, N750DB, etc.
Steps to Configure Belkin Wireless AC Router
- Connect Belkin Router To Your Computer & Modem
Connect the devices in the same order provided below.- Connect the Internet port of the Belkin Router to the LAN Port of Modem using an Ethernet cable
- Connect the LAN port of the Router to the LAN port of Computer using an Ethernet cable
- Switch On the Router
- Power on the Computer
- Switch off the modem
- Connect the Internet port of the Belkin Router to the LAN Port of Modem using an Ethernet cable
- Access Belkin Router Setup Page
To access the web-based setup page, type 192.168.2.1 on the address bar of the browser. The default Login IP address of Belkin WiFi router is 192.168.2.1
There is no password set by default. Leave the Password field blank and click the Submit button.
- Configure Internet On Belkin Router
Click on Connection Type under Internet WAN and select the Internet connection you have from your ISP.
There are mainly four different ways you can configure Internet connection on your Belkin Router. They are:- Dynamic Connection to Configure For Cable Broadband
- Static Connection
- PPPoE Configuration
- PPTP Configuration
- Dynamic Connection to Configure For Cable Broadband
1. Setup Belkin Router for Cable Modem
- If you have a Cable Internet connection, you should select Dynamic option and click next. In most cases, you may need to type the hostname provided by Cable Internet Service Provider.

- In addition to this, to work with the cable modem, you may need to clone the MAC address of your computer using the link/button Change WAN MAC Address.

Use the clone button to copy the MAC address of your computer. Click Apply Changes after entering the details. After having this step, Belkin will be ready to work with your cable internet connection.
This step is important because your Internet Service Provider recognizes registered users using the MAC address of the PC used while activating the connection.
Your ISP will not allow it to access the Internet on a different computer because of the nonregistered MAC address.
We can override this restriction by using the MAC address cloning feature.
2. Setup Belkin Router for DSL Modem Using PPPoE
- You must select PPPoE for most of the DSL Internet connections.

Click Next - Enter the Username and password provided by your DSL Internet Service provider.

Here you should enter the user name and password provided by your Internet Service Provider. You should click on the Save Settings button after entering the details.
Now your Belkin router is configured in PPPoE for DSL broadband connections. If you do not configure in PPPoE(means in bridge mode), you may need to enter username and password (provided by ISP) on your PC whenever you access the Internet.
Another problem with the bridge mode is the inability to share broadband.
3. Configure Belkin Router With Static IP Address
- Select Static and click Next

- Enter the Static IP Address provided by your ISP

Click Apply Changes
Setup Wireless Feature On Belkin Router
To edit the wireless settings, click on the Wireless tab on the setup page. You can edit the Wireless network name and wireless channel here.
Here I have customized certain WiFi settings with personalized information.

Wireless name (SSID) is the name of your wireless network. The most recommended wireless channel is 6. You can use channels 1 and 11 too.
You can use a new name for your WiFi network at the wireless name (SSID) field.
The most recommended wireless channel is 6. Other recommended wireless channels for Belkin WiFi router are 1 and 11.
It is good to change the default SSID with something another.
6. Enable Wireless Security
To enable WiFi security, click on security under the wireless tab, and follow the instructions in the link below.
How to Enable wireless security To Prevent Unauthorized Entry

Do not forget to Update the Firmware
How to Update the Firmware
Change the LAN settings on the Belkin Router
You can change the router IP address from this window. By default, Belkin router IP address is 192.168.2.1, but you can change it to any other valid IP address.

There are some other points you must care about configuring the device. One of them is to ensure the safety of the wireless network.
It is a nice practice to enable MAC address filtering to avoid any unauthorized access to your WiFi network. To learn how to enable the MAC address filter, follow the link below.
How to enable MAC Address Filter
Can not Go Online After Installing Belkin Router
Some users say they were able to access the Internet before adding a Belkin router in their network.
After installing the router, they are not able to go online. There are so many reasons for this issue, and we have an article about how to deal with such a situation.
If you face such an issue on your network, follow the link below to fix it.
I cannot go online after installing the router
